To help you understand how tight hips can cause knee pain you must first appreciate that the knee seldom works in isolation.1 For example, activities that often cause knee pain like squatting, lunging, walking and running all require the feet, ankles, legs and hips to move together in a coordinated fashion. Let’s take a look at running and walking as an example.
A Quick Look at the Parts
Walking and running requires you to transfer weight from side to side as you step forward with alternating feet. Part of this weight transfer is possible because the feet have the capability to roll inward toward each other (i.e., pronate). When the foot pronates, the ankle rolls in with it, which in turn helps rotate the lower leg, knee and thigh toward the midline of the body.4 The thigh bone, which fits into the pelvis to form the hip socket, should also rotate inward in time with the lower leg as weight is transferred from left to right and vice versa.6
So How Can Tight Hips Cause Knee Pain?
As you now know, pronation of the foot enables the ankle and lower leg to roll inward. However, if the hip is tight or lacks the flexibility to turn inward at the same time, then a tug-of-war ensues between the upper and lower leg and the knee joint is caught in the middle. This stress to the knee can lead to pain and dysfunction.5
What Causes Tight Hips?
A primary cause of hip immobility is extended periods of sitting. Whether at a computer, driving, eating, playing video games and/or watching TV, prolonged sitting places the hip sockets in a constantly flexed position. Over time, this can lead to movement restrictions in the hip.7 Overdoing athletic movements that require only one or two ranges of motion for the hips, like bike riding or running, can also lead to muscle and soft tissue restrictions and subsequent hip immobility. This immobility or tightness of the hips is a major contributor of knee pain.
Are Tight Hips Causing Your Knee Pain?
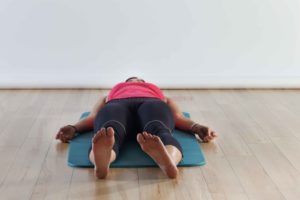
Assessing hip mobility, specifically the ability of the hip to rotate inward, is a relatively straightforward process. Lie on the floor on a mat. Spread your legs about 18 inches to 2 feet apart and try to turn both of your legs inward so your feet move toward each other (see Picture 1). Look to see if one leg cannot turn as far in as the other leg and/or feel which side is tighter. Both legs should be able to turn in about 30° – 40°. In the example below, the client has almost an acceptable range of motion for her left leg, while her right leg is severely lacking the mobility to rotate inward.

Picture 1: Lying Hip Assessment
If you or your client lacks mobility in either, or both, of their hips, this may be the cause of their knee pain (as well as other issues). Therefore, the first and most important goal is to release tension from the larger muscles that help control hip function. There are many corrective exercises you can teach clients to improve hip mobility. However, the first and most appropriate strategies to use are self-myofascial release (SMR) techniques.5 Below you will find three simple SMR exercises that will greatly improve the mobility of the hips. Performing these exercises on a regular basis will help both you and your client’s knees (and the rest of the body) feel and function better.
Corrective Exercises for Knee Pain
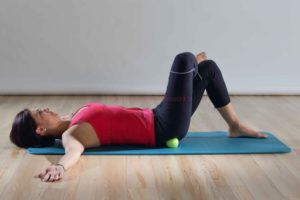
Tennis Ball on Butt
The gluteus maximus muscle helps control rotation of the leg and the hip socket. Using a tennis ball to release and rejuvenate this muscle (and the other smaller hip rotators muscles of this area) will enable the leg to rotate more freely in the hip socket and take stress and strain off the knees.

Lie on the floor with your knees bent and place a tennis ball under one side of your butt. Move around on the tennis ball to find a sore spot. Pause on each sore spot you find for 10 to 20 seconds. As the tension releases move to a new spot. Perform at least once a day for about 2 to 3 minutes on each side.
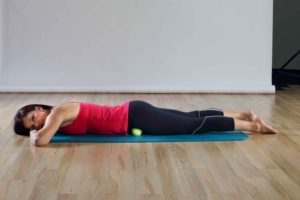
Tennis Ball on Hip Flexors
The hip flexor muscles originate on the lumbar spine, cross the pelvis and attach to the top of the leg. They help control rotation of the leg and hip socket. Performing the following SMR technique with a tennis ball is an effective way to increase hip mobility and reduce knee pain.

Lie face down and place a tennis ball under the front of your hip/leg and find a sore spot. Maintain pressure on the sore spot for 10 to 20 seconds until the sensation lessens, and then move the ball up and onto your abdominal region. Use the tennis ball to release all sore spots along the way from the top of the hip to just beside your bellybutton. (Note: Do not place the tennis ball on the sensitive areas just to the side of the pubic bone where the leg meets the groin.) Perform this exercise once per day for about 1 to 2 minutes each side.
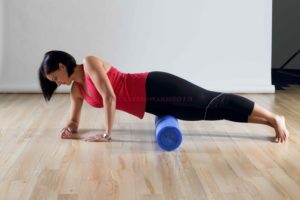
Foam Roller on Side and Front of Leg
There are two other important structures on the upper leg that help control rotation of the hip and leg. The iliotibial band connects the gluteal muscles to the lower leg and the rectus femoris, which is a quadriceps muscle, originates on the pelvis and connects to the kneecap. These structures must be healthy and flexible to enable the hip and knee to work correctly.

Lie over a foam roller placed perpendicular to your upper leg. Roll your body to the side so the front and outside of your upper leg makes contact with the roller. Roll on any sore spots you find doing each leg for approximately 1 to 2 minutes every day.
Note: If the pressure of the foam roller is too much you can regress this exercise by placing a tennis ball under the side and front of your leg instead while lying down.
Many of the largest and most powerful muscles of the body cross the hips and attach to the leg.2,3 Restrictions in these muscles affect the ability of the hips to function correctly and, subsequently, the amount of stress experienced by the knees. The simple hip assessment and effective corrective exercise strategies outlined in this blog can help both you and your clients experience substantially less knee pain as well as improved performance in both the short and long-term.
To learn more about how to discover the underlying causes of you and your client’s aches and pains check out The Fundamentals of Structural Assessment Course (Module 1 of The BioMechanics Method Corrective Exercise Specialist program) or click on the image below.
References:
1American Council on Exercise. 2010. ACE Personal Trainer Manual (Fourth Edition). American Council on Exercise.
2Golding, L.A. & Golding, S.M. 2003. Fitness Professional’s Guide to Musculoskeletal Anatomy and Human Movement. Monterey, CA: Healthy Learning.
3Gray, H. 1995. Gray’s Anatomy. New York: Barnes & Noble Books.
4Kendall, F.P. et al. 2005. Muscles Testing and Function with Posture and Pain (5th ed.). Baltimore, MD.: Lippincott Williams & Wilkins.
5Price, J., and M. Bratcher. 2018. The BioMechanics Method Corrective Exercise Specialist Certification Program. 2nd Ed. San Diego, CA: The BioMechanics Press.
6Price, J. 2018. The BioMechanics Method for Corrective Exercise. Champaign, IL: Human Kinetics.
7Rolf, I. P. 1989. Rolfing: Reestablishing the Natural Alignment and Structural Integration of the Human Body for Vitality and Well-Being (revised edition). Rochester, VT: Healing Arts Press.
